How to Convert an STL to G-code for 3D Printing
Oct 29,2023 | 3D4Create
Confused about how to convert STL files into printer-ready G-code? Unsure which slicer settings are critical for success? This guide has you covered! We’ll walk through slicing 3D models into G-code, explaining each step clearly along the way. Follow along to master STL to G-code conversion for flawless prints!
- ● What Is an STL File?
- ● Selecting a Slicer Software
- ● Importing and Preparing STL Files
- ● Configuring Slicer Settings
- ● Generating G-code and Transferring it to 3D Printer
- ● Conclusion
What Is an STL File?
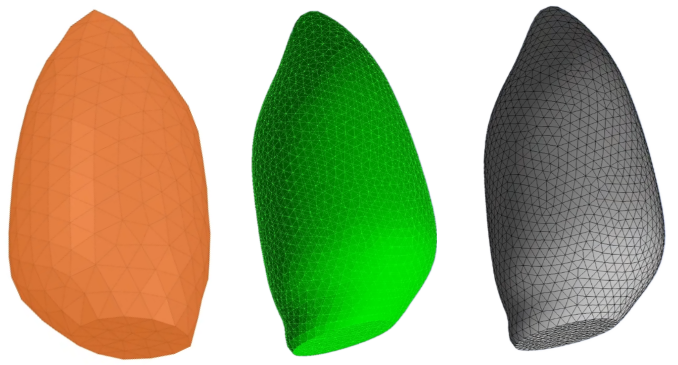
STL files represent 3D models by tiling their surfaces with small triangles, a process called tessellation. This mesh made of tiny triangles precisely encodes the exterior geometry and dimensions of an object while omitting details like color and texture. The more complex the 3D model, the more triangular facets required to accurately capture fine details and complex contours.
The file consists of two main sections: the header, which provides information about the file, and the data section, which contains the geometric data of the model. Of course, there are other file types for 3D printers such as OBJ and AMF.
To view and edit STL files, several software options are available. Some popular choices include MeshLab, FreeCAD, and Blender. These programs allow you to visualize, analyze, and optimize the files
Selecting a Slicer Software
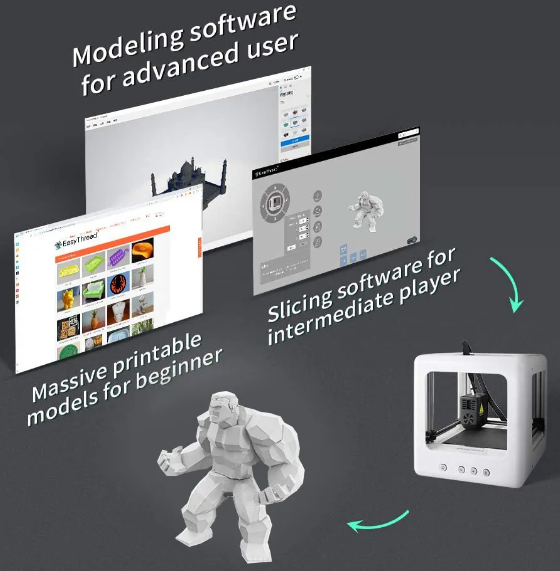
To convert STL files to G-code, you'll need a reliable slicer software. Slicer software acts as a bridge between the 3D model and your 3D printer. It slices the model into layers and generates the corresponding G-code instructions that the printer understands.
When selecting a slicer software, consider factors such as compatibility with your printer, user-friendly interface, availability of advanced features, and community support. Some popular slicer software options include Bambu Studio, Ultimaker Cura, PrusaSlicer, and Simplify3D.
EasyThreed Nano 3D Printer for Kids
Importing and Preparing STL Files
Once you have selected the slicer software that suits your needs, it's time to import your STL files. Most slicer software allows for easy importing by simply dragging and dropping the files into the program. Once imported, you can visualize and analyze the model within the software.
However, before proceeding to generate G-code, it's essential to ensure that the STL file is error-free. Some common issues with STL files include non-manifold geometry, inverted normals, and self-intersecting surfaces. These issues can lead to printing errors or poor-quality prints. To address these problems, you can use repair tools available in the slicer software or third-party software like Blender, Meshmixer, Netfabb.
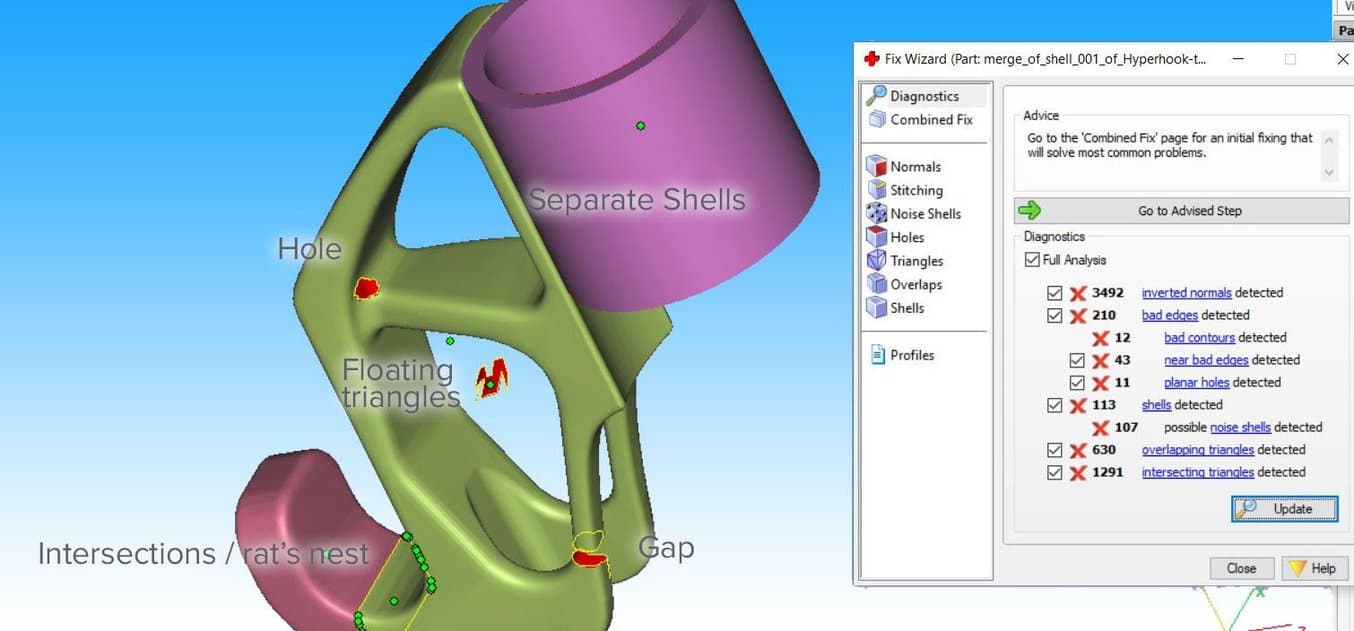
A 3D Model Mesh with Various Flaws(photo: formlabs)
Configuring Slicer Settings
Proper configuration of slicer settings is crucial for generating accurate G-code. These settings determine various parameters for printing, such as layer height, print speed, print temperature, infill density, support structures, and more. Adjusting these settings based on your specific requirements and printer capabilities can greatly impact the print quality and efficiency.
Start by selecting an appropriate layer height. A thinner layer height provides higher detail but increases print time. Next, consider the print speed and temperature settings. Faster speeds may sacrifice some quality, while higher temperatures can improve layer adhesion. Balancing these parameters is key to achieving optimal results.
Additionally, infill density determines the internal structure of the print. Higher densities result in stronger and more rigid prints but consume more filament. Experiment with different infill patterns and densities to find the right balance between strength and material usage.
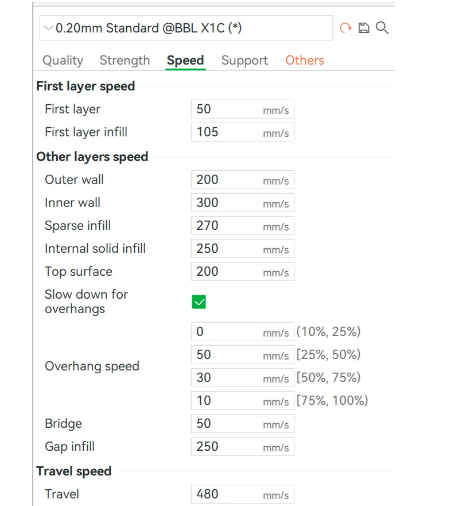
Bambu Studio Speed Settings
Generating G-code and Transferring it to 3D Printer
Once you've configured the slicer settings, it's time to generate G-code. This process involves slicing the 3D model into layers and generating the instructions that the printer needs to create each layer.
In the slicer software, you can preview the layers and examine how the model will be printed. This preview allows you to spot any potential issues and make adjustments if necessary. Once you are satisfied, simply click the "Export" or "Save G-code" button to create the G-code file.
With the G-code file generated, it's time to transfer it to your 3D printer. There are several ways to do this, depending on your printer type and connectivity options. The most common methods include transferring the G-code file using an SD card, sending it directly to the printer via USB, or uploading it remotely through a wireless network connection.
Ensure that your printer is properly configured and connected before initiating the transfer. Confirm compatibility between the generated G-code and your printer's firmware to avoid any communication or interpretation issues.

Use Simplify3D to transfer Gcode to the 3D printer(photo: digitalfire)
Conclusion
Congratulations! You've reached the end of our comprehensive guide on converting STL files to G-code for 3D printing. We've covered the key steps from STL editing to flawless G-code generation.
Mastering this process is crucial for creating amazing 3D prints. Remember to keep iterating and improving your techniques. Accurate G-code is the foundation of high-quality 3D printing. By following this guide and continuously refining your skills, you'll be able to produce exceptional prints.
FAQS:
Q1: What file formats can be used for 3D printing?
A1: The most common file format is STL. Some other options are OBJ, 3MF, AMF. STL files are widely compatible with most 3D printers and slicer software.
Q2: How do I convert STL files to G-code for 3D printing?
A2: You need a slicer software like Cura, Simplify3D etc. to convert STL to G-code. The slicer slices the STL model into layers and generates G-code instructions for the printer.
Q3: What slicer settings impact print quality and efficiency?
A3: Key settings include layer height, print speed, temperature, infill, supports. Optimizing these for your specific model and printer is important for good prints.
Q4: What are some common issues that can occur with G-code files?
A4: Typical G-code issues include layer adhesion problems, stringing, under/over-extrusion. Examining G-code preview and tweaking slicer settings can help address them.
Q5: How do I transfer G-code from slicer software to my 3D printer?
A5: Common transfer methods are SD card, USB cable, wireless network. Ensure printer compatibility before transferring the G-code file.
Comment